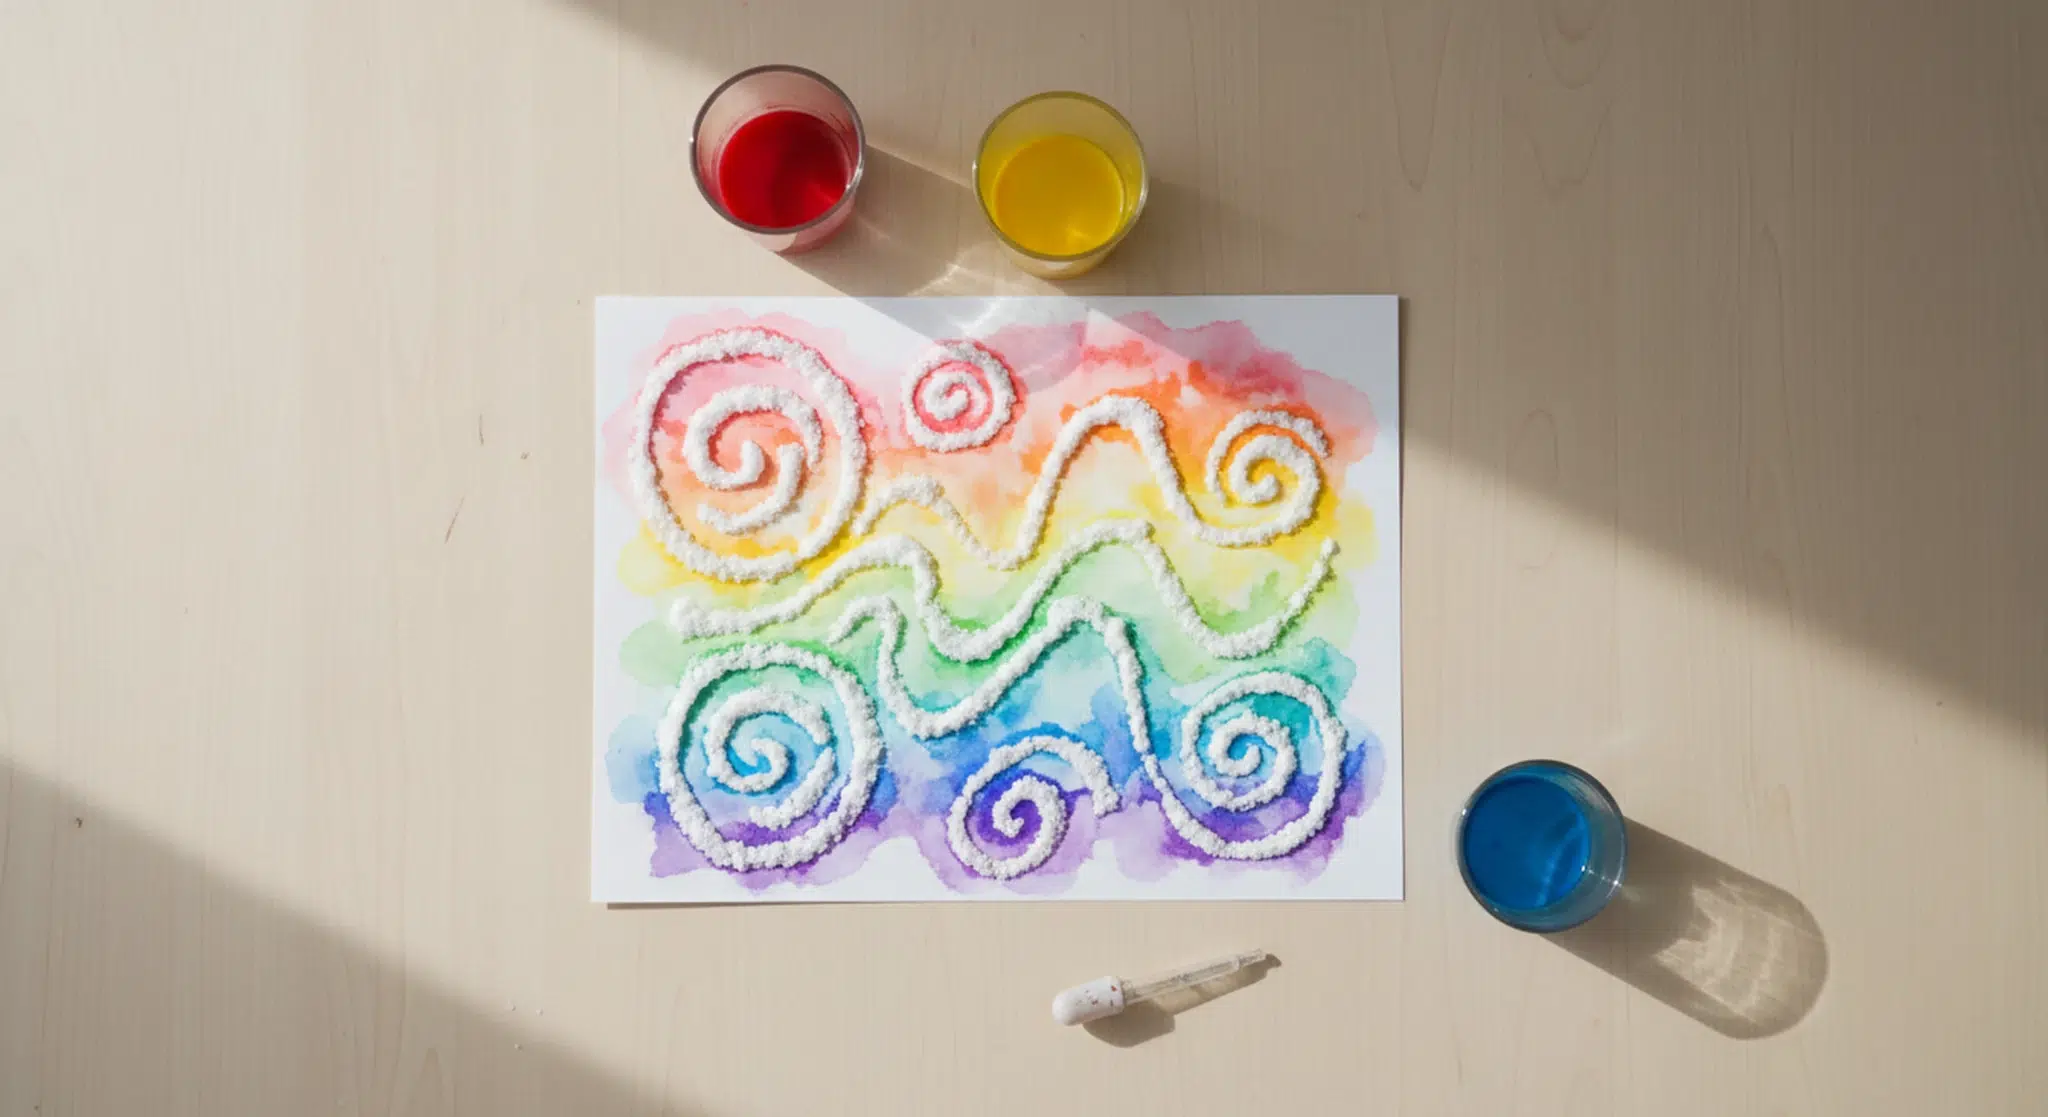
Salt painting is an easy kids’ art project: you draw with white glue, cover the lines with table salt, then drip on liquid watercolor so the color travels and blends along the salty lines.
Salt painting needs only glue, salt, heavy paper and some color, and the moment a drop races along a line of salt, kids are hooked.
Here are supplies and swaps, step by step directions, realistic drying times, tips by age, 15 ideas, troubleshooting, and safety basics for salt, small parts and pets.
Key Takeaways
Salt painting means glue lines, a coat of table salt, then drops of liquid watercolor that spread along the lines.
Use cardstock or other heavy paper so the wet glue does not warp the page.
Drying time varies; plan on several hours to overnight, flat on a tray.
Toddlers need heavy adult help; kids 5 and up can do most steps alone.
Keep the salt, droppers and caps away from toddlers and pets, since large amounts of salt are dangerous.
As an Amazon Associate, Betteroo earns from qualifying purchases.
Table of Contents
What Is Salt Painting?
Quick Answer
Salt painting is a kids’ art activity where you draw lines with white school glue, cover them with table salt, shake off the extra, and then touch drops of liquid watercolor (or water tinted with food coloring) to the salty lines. The salt soaks up the color and carries it along the line, so one drop spreads and blends into the next. You need glue, salt, cardstock and color, and it takes about 20 to 30 minutes plus drying time.
You may also see it called raised salt painting, because the glue and salt dry into a bumpy, sparkly texture that sits up off the page.
The hook is the moment the color moves: one touch of a dropper and the color races down the line, then meets a second color and mixes into something new.
Why Kids Love It (and What It Builds)
Salt painting has a few simple steps but no right way for the finished picture to look, which makes it a natural fit for process art, which the National Association for the Education of Young Children (NAEYC) describes as a choice-driven, open-ended activity where adults give minimal direction and the experience matters more than the product.
Language and ideas: NAEYC notes that art gives young children another way to express ideas and experiences, which can grow vocabulary. Try words like spread, soak, blend and bumpy.
Hand control: Zero to Three explains that as children gain control of the muscles in their hands, they can move a marker or paintbrush with purpose. Squeezing glue and pinching a dropper give small hands that practice.
Thinking and noticing: NAEYC calls process art a thinking tool. Kids test one drop versus three, or yellow next to blue, and see cause and effect.
Playing together: NAEYC also points out that process art creates chances for conversation and cooperation. A shared salt tray is gentle turn-taking practice.
Pipettes suit older kids. A soft brush is easier for little hands: touch, don’t brush.
Baking sheet or tray
Catches loose salt when you shake off the extra
A box lid or large plate. Save leftover salt for next time.
Small cups for color
Keeps each color separate
Muffin tin or ice cube tray. One dropper per color.
Pencil (optional)
Sketch a shape first
Cookie cutters make easy tracing templates.
Salt painting supplies, what they do, and what to use instead.
If you buy art supplies for children, the Art and Creative Materials Institute (ACMI) recommends looking for its AP Seal on products for kids in sixth grade or younger. It means a toxicologist evaluated the product and found no materials in amounts that would be toxic or harmful. ACMI says CL Seal (cautionary label) products should not go to children that age.
How to Do Salt Painting Step by Step
Set aside about 20 to 30 minutes for the hands-on part.
1. Set up the tray: Lay cardstock on a tray. Fill a small cup with salt and pour each color into its own cup.
2. Draw with glue: Squeeze glue in lines, swirls or shapes. Thick, connected lines work best because color only travels where glue and salt touch. Big simple shapes beat fine detail.
3. Cover with salt right away: While the glue is wet, cover every bit with salt. Uncovered glue will not soak up color.
4. Shake off the extra: Tip the paper on its edge and tap gently so loose salt falls onto the tray.
5. Add the color: Touch the dropper or brush to the salt line and watch the color spread. Add a second color a little way down so the two blend. A dot beats a puddle.
6. Let it dry flat: Leave it flat on the tray. Drying time varies with glue thickness, how much liquid you used and humidity: plan on several hours to overnight, longer for thick lines. It is dry when the salt feels crunchy, not damp.
A tip many tutorials skip: you can paint while the glue is wet for softer blending, or let the glue and salt dry first for crisper color and less mess.
Big days go better with a good night of sleep.
Got a little one at home too? Our free two-minute quiz builds a gentle, personalized sleep plan for babies and toddlers.
Glue line too thin, salt dried out, or color too thick
Thicker lines, more water in the color, touch rather than brush
Colors turn muddy or brown
Too many colors in one spot, or too much liquid
Two or three colors that mix well, one drop at a time
Puddles on the paper
Too much liquid at once
Blot gently with a paper towel corner and use smaller drops
Gaps where color stops
Some glue was not covered with salt, or the line was broken
Cover every bit of glue with salt; make lines that connect
Salt falls off after drying
Thin glue line or salt that was not pressed into wet glue
Thicker lines, plenty of salt; hold pieces by the edges
Paper curls or warps
Paper too thin for wet glue and liquid
Use cardstock or cardboard and dry it flat
Common salt painting problems and fixes.
How to Make It Last and Display It
Dried salt can flake off when the paper bends, so:
Let the painting dry completely and keep it flat while it dries.
Store it flat or upright, never rolled or folded.
Hang it with tape on the back edges.
Take a photo in case the salt crumbles.
Some families seal finished pieces with a light coat of clear spray. If you try this, it is a job for adults only, outdoors, away from kids and pets, following the label directions.
Mess Management and Cleanup
A little setup contains the mess:
Work on a tray: A rimmed baking sheet catches almost all the loose salt.
Cover the table: An old tablecloth, a vinyl mat or newspaper underneath saves wiping.
Dress for color: Food coloring and liquid watercolor can stain clothes and skin, so use an old shirt or smock.
Small portions: Pour just a little salt and color at a time. Spills stay small and leftovers are easy to save.
Clean up dry first: Sweep or vacuum loose salt before you wipe, since wet salt gets sticky with glue.
Safety: Salt Is Not a Snack
Large amounts of salt are dangerous: The Tennessee Poison Center at Vanderbilt University Medical Center warns that eating a large amount of salt can cause high sodium levels in the blood (hypernatremia), with confusion, lethargy and seizures. It found that just one tablespoon of some high salt homemade play dough recipes could put a child weighing about 22 pounds (10 kg) in the toxic range. Keep the salt container out of reach and pour only a little.
Call Poison Control if you are worried: If your child eats a large amount of salt or a salty craft material, call Poison Control at 1-800-222-1222 or use the free webPOISONCONTROL tool at poison.org. If your child is having a seizure, is very drowsy or is hard to wake, call 911.
Pets are at risk too: Pet Poison Helpline lists homemade salt dough ornaments and salt play dough as sources of salt poisoning in pets, with signs such as vomiting, diarrhea, stumbling, tremors and seizures. Keep salt and drying paintings away from pets. If you think your pet ate salt, call your veterinarian or Pet Poison Helpline at (855) 764-7661 (a fee applies).
Watch small parts with under 3s: The American Academy of Pediatrics (AAP) says babies and toddlers have the highest choking risk because they explore by mouth, and it lists marker and pen caps and medicine syringes among household items to keep away from young children. Treat dropper tips and glue caps the same way.
Keep art supplies out of mouths: Choose child friendly supplies (look for the ACMI AP Seal), wash hands after painting, and keep food and drinks off the craft table.
Salt painting is one of the easiest ways to bring a little color magic to an ordinary afternoon: glue, salt, cardstock and a few drops of color are all it takes. Keep it open ended, adjust the steps for your child’s age, give it time to dry flat, and keep the salt and small parts away from toddlers and pets. Then step back and let your child enjoy watching the color travel.
Frequently Asked Questions
How do you do salt painting?
Draw a design on cardstock with white school glue, cover every bit of the glue with table salt, and tip the paper to shake off the extra. Then touch a dropper or brush with liquid watercolor or tinted water to the salt line and watch the color spread. Let the painting dry flat for several hours or overnight.
Can you use food coloring for salt painting?
Yes. Mix a few drops of food coloring into a small cup of water for each color. Thin, watery color travels along the salt better than thick paint. Food coloring can stain skin, clothes and tables, so cover your work surface and have your child wear an old shirt or smock.
How long does salt painting take to dry?
Drying time depends on how thick the glue lines are, how much liquid you used and how humid your home is. Most salt paintings need several hours to dry, and thick lines may need overnight or longer. Keep the paper flat on a tray until the salt feels crunchy and dry.
Do you let the glue dry before adding salt?
No. Add the salt while the glue is still wet so it sticks. After you shake off the extra salt, you can either add color right away for softer blending, or let the glue and salt dry first and paint later for crisper color and a little less mess.
What age is salt painting good for?
Salt painting works for children from about age 2 with heavy adult help, through elementary school and beyond. Toddlers can shake salt and touch a brush to the line while you handle the glue. Preschoolers can squeeze glue with help, and kids 5 and older can usually do the whole project themselves.
Is salt painting safe for toddlers?
It can be, with close supervision. Eating a large amount of salt is dangerous for young children, so pour only a little, keep the container out of reach and do not let toddlers eat from the tray. Put away small dropper tips and caps, which are choking hazards. Call Poison Control if you are worried.
Gentle changes, peaceful nights.
Betteroo builds a personalized sleep plan for your baby or toddler. Take the free two-minute quiz to get started.
Fernando-Smith, L. What Will We Make? Using Process Art to Spark Preschoolers’ Development. National Association for the Education of Young Children (NAEYC), 2023. https://www.naeyc.org/node/4824